JBL speakers have earned a loyal following over decades — from the iconic L100 Century to the compact Control One monitors found in studios worldwide. The engineering is solid. But foam surrounds have a lifespan of 10 to 20 years, and when they perish, even the best drivers go quiet. The good news: JBL speaker foam repair is one of the most straightforward DIY jobs in audio restoration, and the results are dramatic.
Why JBL Foam Surrounds Fail
Polyurethane foam breaks down over time through a process called hydrolysis — exposure to humidity, heat and oxygen slowly degrades the foam until it crumbles or develops tears around the cone edge. JBL drivers from the 1970s through to the early 2000s are particularly susceptible. Symptoms include a rattling or distorted sound at low volumes, visible cracks or missing sections around the surround, or a cone that moves unevenly when pressed gently.
The fix is a new foam surround. You don't need to replace the driver, the basket, or the magnet — just the surround and a small amount of adhesive.
Which JBL Repair Kit Do You Need?
Getting the right size is critical. JBL used several driver sizes across their speaker lines, and the correct kit depends on the outer diameter (OD) of the existing surround — not just the advertised speaker size. Use a ruler or digital callipers to measure the OD of the surround (not the cone), then match to the kit below.
- JBL Control One, Control 1C, Control 1G, SB1, Control 1SE (5"): JBL Control One 5" Foam Repair Kit
- JBL 6.5" drivers (various bookshelf and floor models): JBL 6.5" Foam Repair Kit
- JBL 8" drivers (L40, L50, L80 and others): JBL 8" Foam Repair Kit
- JBL 10" drivers (L100, L110, L150 and others): JBL 10" Foam Repair Kit
- JBL 12" drivers (L100T, 4312 studio monitors, L150A): JBL 12" Foam Repair Kit
Each kit includes two foam surrounds (one pair), T7000 adhesive, an applicator brush, and printed instructions. Everything you need for a complete repair.
Step-by-Step: JBL Surround Replacement
What You'll Need
- Your North Speaker Parts repair kit
- Isopropyl alcohol (90%+) and cotton swabs or a cloth
- A flat-head screwdriver or thin spatula
- Patience — this is a 45-minute job per speaker
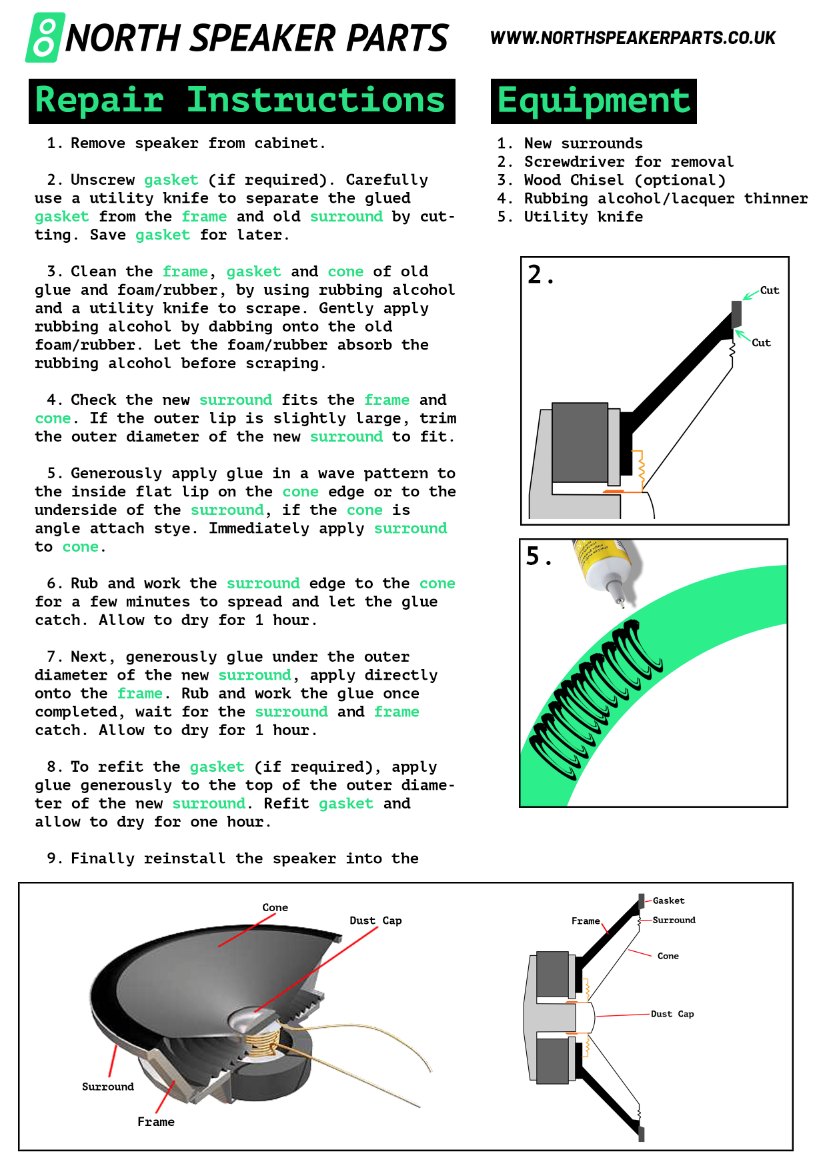
1. Remove the Driver
Unscrew the driver from the baffle. On most JBL cabinets, the woofer is front-mounted with four to six screws. Disconnect the wiring terminals gently — note which wire goes to positive and which to negative before disconnecting.
2. Remove the Old Surround
Peel away the remains of the old foam. It will likely come off in fragments — this is normal. Use isopropyl alcohol and a cotton swab to clean the cone edge and the driver basket rim thoroughly. Any residue left behind will prevent the new surround from bonding cleanly. Allow the surfaces to dry completely before proceeding.
3. Apply Adhesive to the Basket Rim
Apply a thin, even bead of T7000 adhesive around the basket rim (the outer metal edge). Position the new foam surround in place and press gently. Allow 5–10 minutes of working time before the adhesive begins to set — use this window to check alignment. The surround should sit flat and concentric with the basket.
4. Centre the Voice Coil
Before the adhesive on the cone edge sets, you need to centre the voice coil. Apply a small amount of T7000 to the inner edge of the surround, then lower the cone into position. With light finger pressure on the cone, push it in and release — it should spring back smoothly and evenly. If you feel rubbing or hear scraping, adjust the cone position before the glue sets.
5. Cure Time
Allow the repair to cure for at least 24 hours before reinstalling the driver or playing audio. Rushing this step is the most common cause of failed repairs. Once cured, reconnect the wiring (double-check polarity), reinstall the driver, and test at low volume before running full power.
How the JBL 10" Foam Kit Compares
The JBL 10" Foam Repair Kit is one of our most popular products, particularly among owners of the legendary L100 Century. It uses 0.4mm gauge open-cell foam matched to the original JBL specification — stiffer foam alters bass response and can change the resonant frequency of the driver. Getting the gauge right is as important as getting the diameter right.
Common Mistakes to Avoid
- Using too much glue: A thin, even bead is sufficient. Excess adhesive can migrate onto the cone and stiffen it.
- Skipping the cleaning step: Old foam residue will cause the new surround to lift within weeks.
- Not centring the voice coil: An off-centre coil will rub against the gap and distort at any volume.
- Testing before the adhesive cures: T7000 reaches full strength at 24 hours. Testing early can shift the cone position.
Ready to Restore Your JBL Speakers?
Browse the full range of JBL foam repair kits — all sized and gauged for JBL drivers, with same-day UK dispatch and free Royal Mail 1st Class delivery. If you're unsure which size you need, measure the OD of your existing surround and get in touch — we're happy to help you identify the correct kit before you order.