KEF has been engineering speakers in the UK since 1961, and their commitment to acoustic precision has never wavered. From the original KEF 104 to the modern Reference series, the brand is synonymous with accurate, natural sound reproduction. But even the finest drivers are vulnerable to foam surround degradation — and when that foam perishes, the performance drops sharply. KEF speaker repair is one of the most rewarding DIY audio projects you can undertake, and this guide will walk you through it from start to finish.
Signs Your KEF Foam Surround Needs Replacing
The most common symptom is distortion or rattling at low to moderate volumes — a sound that wasn't there when the speakers were new. You might also notice a loss of bass extension, or a cone that looks visibly off-centre. To confirm the diagnosis, press gently on the centre of the cone with one finger. A healthy driver will push in smoothly and return to rest evenly. If it catches, scrapes, or the cone moves unevenly, the foam surround has likely degraded and is no longer supporting the cone correctly.
KEF models most frequently needing foam replacement include the KEF 104, KEF 105, KEF 104/2, the B200 series, various Cresta and Coda models, and older KAR series drivers.
Which KEF Foam Repair Kit Do You Need?
KEF used several driver sizes across their product range. The correct kit is determined by the outer diameter (OD) of the existing surround — measure this carefully with a ruler or digital callipers before ordering.
- KEF KAR-110, KAR110, Coda series (5"): KEF KAR-110 5" Foam Repair Kit — £7.95
- KEF 6.5" woofers (Cresta, Coda 7, various bookshelf models): KEF 6.5" Foam Repair Kit — £8.95
- KEF 104, B-200, SP-1236, SP-1232 8" drivers: KEF 104/B-200 8" Foam Repair Kit — £8.95
All kits include a matched pair of foam surrounds, T7000 adhesive, an applicator brush, and step-by-step instructions.
Step-by-Step: KEF 6.5" Foam Surround Replacement
The KEF 6.5" woofer is the most frequently requested repair size, found across the Cresta, Coda, and Celeste ranges. The process below applies equally to all KEF kit sizes.
Tools Required
- KEF foam repair kit
- Isopropyl alcohol (90% or higher)
- Cotton swabs or lint-free cloth
- Phillips screwdriver, flat-head screwdriver or spatula
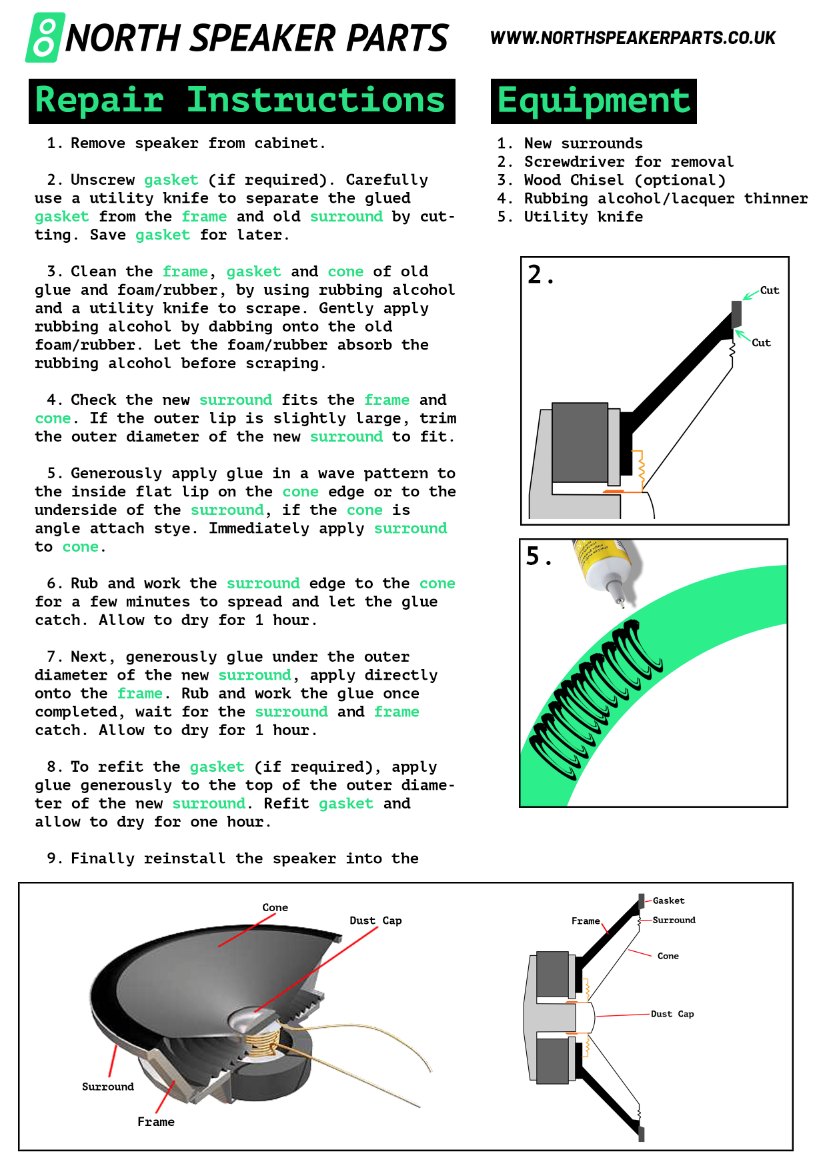
1. Access the Driver
Remove the grille carefully — KEF grilles on older models are typically held in place by press-fit plastic pegs. Unscrew the woofer from the baffle (usually four screws). Tilt the driver forward and disconnect the wiring from the terminals. Note which wire is positive — on most KEF drivers this is marked with a red wire or a + symbol on the terminal.
2. Remove All Old Foam
Peel or scrape away every trace of the deteriorated surround. KEF drivers, particularly the B200 series, often have a thin shim of card or plastic at the basket rim beneath the original surround — keep this in place if present, as it sets the correct height for the new foam. Clean both the basket rim and the cone edge with isopropyl alcohol. Allow to dry completely before applying adhesive.
3. Bond the Outer Edge
Apply a thin, continuous bead of T7000 to the basket rim. Place the foam surround outer edge into the adhesive and press gently. You have approximately 5–10 minutes of working time. Confirm the surround sits flush and even all the way round before the adhesive begins to grip.
4. Centre the Voice Coil and Bond the Inner Edge
This is the most critical step. Apply T7000 to the inner edge of the surround. Rest the cone into position — but don't press it home yet. Gently depress the cone with two fingers and release it. It should return to centre with no resistance or scraping. If you hear any contact from the voice coil, reposition the cone slightly — the coil should float freely in the magnetic gap. Once centred, press the inner surround edge down onto the cone edge firmly.
5. Leave to Cure for 24 Hours
T7000 needs a full 24 hours at room temperature to reach maximum strength. Don't rush this. Once cured, reinstall the driver, reconnect the wiring, and play at low volume first to confirm the repair before driving the speakers hard.
A Note on the KEF 104 and B200 Drivers
The KEF 104 is widely regarded as one of the finest speakers KEF produced in the 1970s. Its B200 SP-1236 and SP-1232 bass drivers are legendary — and they turn up on the secondhand market regularly with perished foam. Our KEF 104 / B-200 8" foam repair kit is matched specifically to these drivers. A correctly repaired B200 is indistinguishable from new in terms of bass extension and definition.
Shop All KEF Foam Repair Kits
All kits are UK-stocked and dispatched the same working day for orders before 4pm. Free UK delivery via Royal Mail 1st Class. Browse the complete KEF foam repair kit range or go straight to the size you need:
- KEF KAR-110 5" Foam Repair Kit — £7.95
- KEF 6.5" Foam Repair Kit — £8.95
- KEF 104 / B-200 8" Foam Repair Kit — £8.95
If you're unsure which kit suits your specific KEF model, get in touch — we can cross-reference your driver against our kit specifications before you order.