Yamaha's natural sound philosophy has produced some of the most respected hi-fi speakers of the past five decades. The NS series, in particular, remains a benchmark for natural reproduction. Owners who track down a pair of vintage Yamaha NS-1000s or NS-500s and discover perished foam surrounds are in the right place — Yamaha speaker foam repair is straightforward, affordable, and delivers a genuine transformation in sound quality.
Why Yamaha Foam Surrounds Deteriorate
Yamaha used polyurethane foam surrounds on the majority of their cone drivers from the 1970s through the 1990s. Polyurethane foam has a natural lifespan of 10–20 years depending on storage conditions. Heat, humidity, and UV exposure all accelerate the process. The result: surrounds that crumble, develop cracks, or separate entirely from the cone or basket — causing distortion, loss of bass, and in some cases a complete absence of sound from the affected driver.
The repair is a direct foam-for-foam replacement. You don't need to replace the entire driver or send the speaker away for service — a repair kit and a few basic tools are all it takes.
Which Yamaha Foam Repair Kit Do You Need?
Yamaha used several driver sizes across their speaker range. The correct kit depends on the outer diameter (OD) of the existing surround, which you should measure with a ruler or digital callipers before ordering. Here are the kits we stock for Yamaha drivers:
- Yamaha JAY-3050, JAY3050 and similar 6" models: Yamaha JAY-3050 6" Foam Repair Kit — £8.95
- Yamaha 6.5" woofers (NS-A636, various bookshelf models): Yamaha 6.5" Foam Repair Kit — £8.95
- Yamaha 8" woofers (NS-500, NS-690, NS-700, NS-A08): Yamaha 8" Foam Repair Kit — £8.95
- Yamaha 10" woofers (NS-1000M, NS-1000, NS-2000 and floor-standers): Yamaha 10" Foam Repair Kit — £9.95
- Yamaha 12" woofers (NS-2000, larger floor-standing models): Yamaha 12" Foam Repair Kit (OD: 290mm, ID: 215mm) — £14.95
Each kit contains a pair of matched foam surrounds, T7000 adhesive, an applicator brush, and printed instructions.
Step-by-Step: Yamaha 8" Foam Surround Replacement
The 8" woofer is among the most common Yamaha drivers in need of repair. Here's the full process:
What You'll Need
- Your Yamaha foam repair kit
- Isopropyl alcohol (90%+)
- Cotton swabs or lint-free cloth
- Phillips and flat-head screwdrivers
- Clean workspace with good lighting
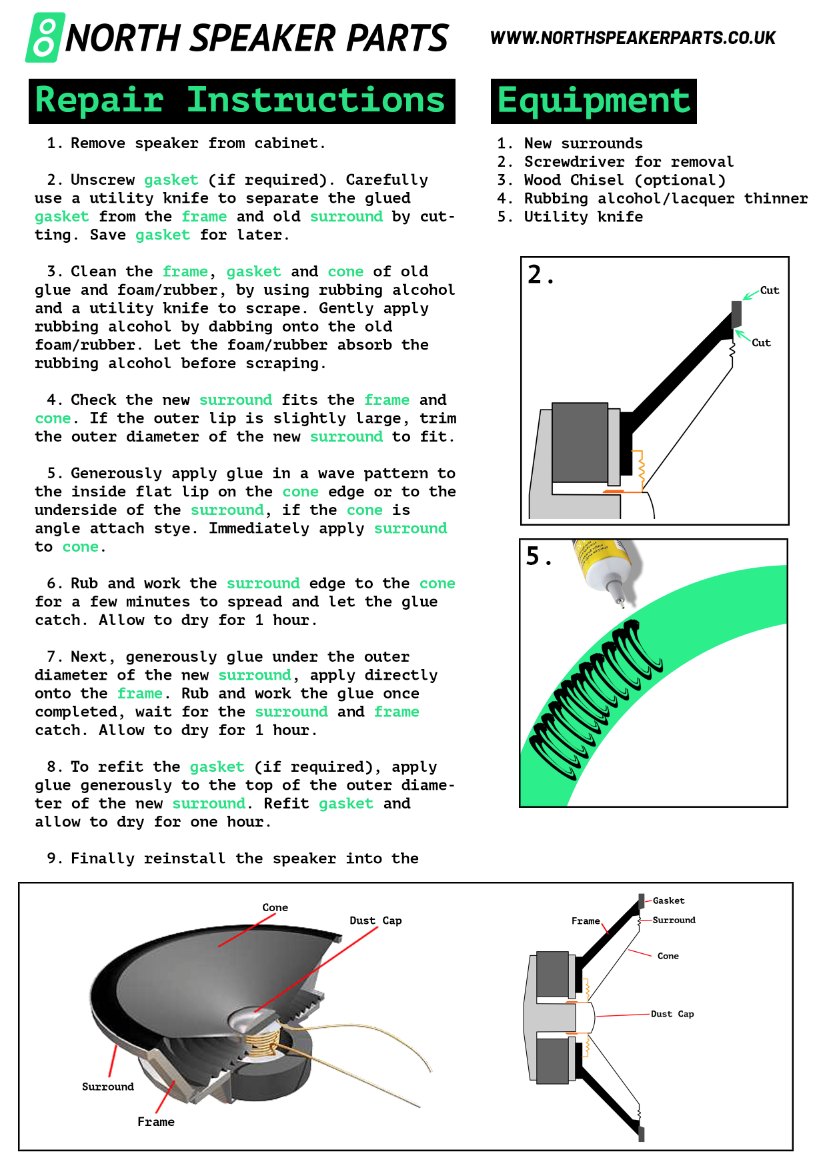
1. Remove the Woofer
Remove the grille (most clip on or are held by small screws at the cabinet corners). Unscrew the woofer from the baffle — typically four screws. Tilt forward and carefully disconnect the wiring terminals. Note polarity before disconnecting: the red or positive wire on Yamaha speakers is usually marked with a dot or stripe on the terminal.
2. Remove the Old Foam
Peel away the deteriorated surround. On most Yamaha drivers, the foam will come away in fragments — this is completely normal. Use a flat spatula or old screwdriver to scrape off any remaining residue from both the basket rim and the cone edge. Clean both surfaces with isopropyl alcohol and allow to dry fully before proceeding.
3. Apply Adhesive and Seat the Outer Edge
Apply a thin, even bead of T7000 around the basket rim. Position the foam surround over the basket, outer edge down, and press gently into the adhesive. Check that the surround sits level and concentric — it should be even all the way around with no high or low spots. T7000 gives you 5–10 minutes of working time before it starts to grab.
4. Centre the Voice Coil and Attach the Inner Edge
Apply a thin bead of T7000 to the inner lip of the surround. Lower the cone edge into position. Press the cone gently down and release — it should spring back to centre with no contact or scraping from the voice coil. If you feel rubbing, the coil is off-centre: shift the cone position slightly and test again before the glue fully sets. This step determines whether the repair sounds clean or distorted.
5. Cure and Test
Leave the repaired driver flat for 24 hours. Once cured, reinstall, reconnect the wiring (positive to positive), and test at low volume. A properly repaired Yamaha woofer should produce clean, deep bass with no distortion or mechanical noise.
The Yamaha NS-1000M: A Special Case
The NS-1000M is one of the most celebrated studio monitors ever made, and its 10" woofer is a frequent candidate for foam replacement. The driver uses a fairly standard 10" foam surround — our Yamaha 10" Foam Repair Kit is sized and gauged to match. If you're restoring NS-1000Ms, take extra care during the voice coil centring step — the tight gap tolerance on these drivers rewards patience.
Shop Yamaha Repair Kits
All Yamaha kits are in stock and dispatched the same day for orders placed before 4pm. Free UK delivery via Royal Mail 1st Class. Browse the full Yamaha speaker repair kit collection or jump straight to the size you need: