
Worldwide Shipping: Tracked Delivery to Every Country

Whether you're in London or Los Angeles, Manchester or Melbourne, we ship speaker repair kits to your door — every country, every time, with tracking included.

We know ordering speaker parts internationally can feel like a bit of a gamble. Will it actually turn up? Will you be able to track it? Here's exactly how we handle worldwide shipping at North Speaker Parts.

🌍 We Ship to Every Country

No matter where your speakers are waiting to be repaired, we've got you covered. From our base in Manchester, UK, we dispatch repair kits worldwide — there's no country we won't ship to.

⚡ Same Day Dispatch

Order before 4pm and your kit goes out the same day. We know the worst part of a DIY project is waiting around for parts, so we keep dispatch times as tight as possible on every order, UK or international.

📦 Tracked Every Step of the Way

Every order — no matter the destination — ships with tracking, so you're never left guessing:

  • UK orders: Royal Mail 24 Tracked
  • International orders: Royal Mail International Tracked

You'll receive a tracking number as soon as your order is dispatched, so you can follow it right to your door, wherever you are in the world.


🛠️ Ready to Get Your Speakers Sounding Great Again?

Browse our full range of foam and rubber repair kits and find the right size for your speakers. Not sure which kit you need? Drop us a message through our website chat with your speaker's make and model, and we'll point you in the right direction.

Back to blog

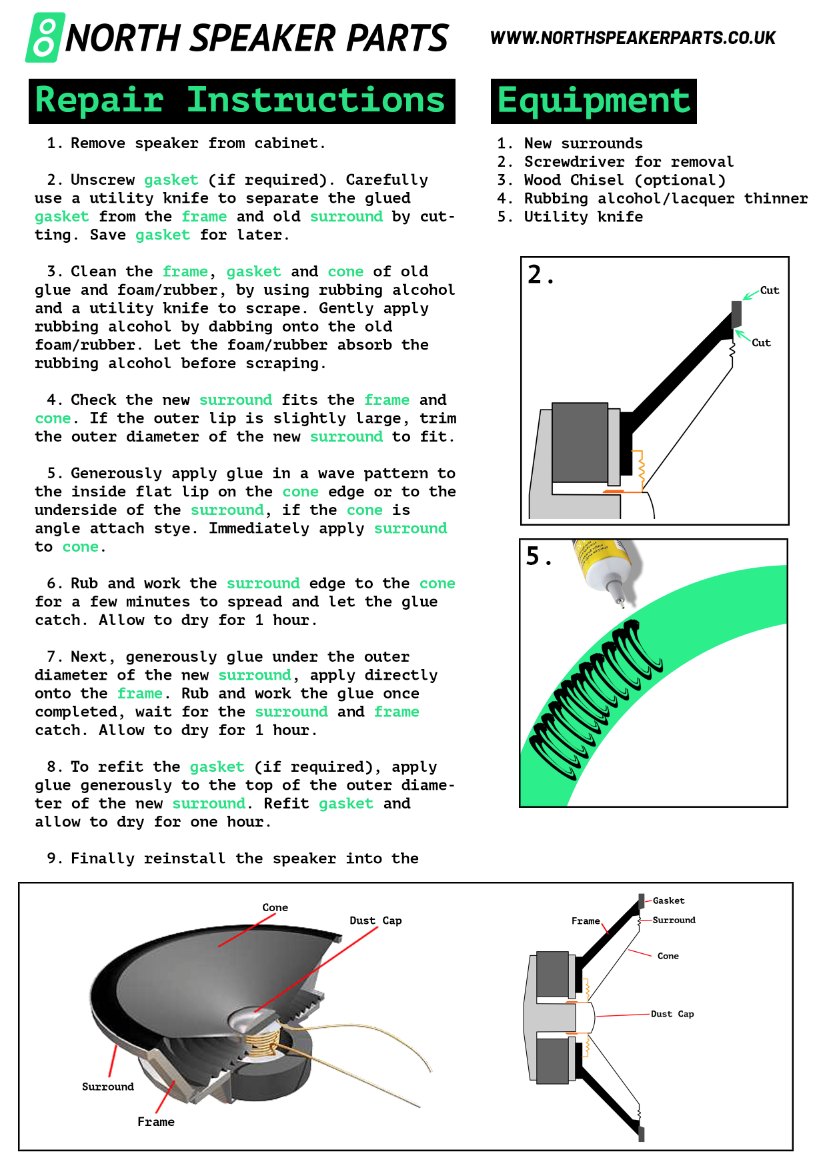
Instructions

Instructions

Required Equipment

  • New speaker surrounds
  • Screwdriver (for speaker removal)
  • Utility knife
  • Rubbing alcohol or lacquer thinner
  • Speaker repair glue
  • Wood chisel (optional, for stubborn residue)

Step-by-Step Instructions

Phase 1: Disassembly & Cleaning

  1. Remove the Speaker: Unscrew the speaker driver from the cabinet and disconnect the wires.
  2. Detach the Gasket: If your speaker has a gasket, use a utility knife to carefully slice through the glue separating it from the frame and old surround. Save the gasket for reinstallation later.
  3. Clean the Surfaces: Dab rubbing alcohol onto the old foam/rubber residue on the frame, gasket, and cone. Let it soak in to soften the glue, then carefully scrape it clean using your utility knife or chisel. The surfaces must be completely clean and dry before proceeding.

Phase 2: Fitting & Gluing the Inner Edge

  1. Dry Fit the New Surround: Place the new surround onto the cone and frame to check the fit. If the outer lip is slightly too large, carefully trim the outer edge with your utility knife.
  2. Glue Surround to Cone: * If the cone has a flat lip, apply glue in a continuous wave pattern directly to that lip.If the cone is angled, apply the wave pattern of glue to the underside of the inner surround lip.Apply the surround to the cone immediately after gluing.
  3. Secure the Inner Bond: Gently rub and work the inner edge of the surround against the cone for a few minutes to ensure the glue spreads evenly and begins to tack. Allow it to dry for 1 hour.

Phase 3: Gluing the Outer Edge & Reassembly

  1. Glue Surround to Frame: Lift the outer edge of the surround and apply a generous layer of glue directly onto the speaker frame underneath. Press the surround down, working it with your fingers to ensure a good bond. Allow it to dry for 1 hour.
  2. Reattach the Gasket: If you removed a gasket in Step 2, apply a layer of glue to the top outer diameter of the new surround. Press the gasket firmly back into place. Allow it to dry for 1 hour.
  3. Reinstall the Speaker: Reconnect the speaker wires and screw the speaker driver back into its cabinet.

Pro-Tips for Success

  • Take Your Time Scaping: The bond of your new surround is only as good as the cleanup job. Don't rush the removal of the old glue.
  • The Wave Pattern: Gluing in a tight "S" or wave pattern ensures full surface coverage without creating a massive, runny mess when pressed down.
Button label