General Questions
I am not sure if a repair kit fits my speaker. What should I do?
STOP! Please contact North Speaker Parts right away before applying any adhesive. If you are unsure of the fit, sizing, or compatibility, do not attempt the installation. We cannot accept returns or exchanges on kits that have had glue applied or show signs of installation attempts. Drop us a message with your speaker brand and model number, and we will guide you to the right kit.
How do I measure my speaker to find the right surround?
To find a matching surround, you need to take four precise measurements using a ruler or calliper (ideally in millimetres):
- Outer Diameter (A): The absolute outside edge of the new foam/rubber surround.
- Outer Roll Diameter (B): The measurement across the outer edge of the raised "roll" or hump.
- Inner Roll Diameter (C): The measurement across the inner edge where the raised "roll" meets the inner flat lip.
- Inner Diameter (D): The absolute inside edge of the surround lip that attaches to the speaker cone.
Tip: Always check whether your speaker cone has a flat lip or an angled lip where the inner surround attaches, as this changes the type of kit you need.
What is the difference between a "flat" cone and an "angled" cone?
- Flat Edge Cone: The edge of the speaker cone is flat/horizontal where the inside lip of the surround glues down.
- Angled Edge Cone: The edge of the speaker cone slopes downward or angles toward the center. This requires an angled-attach surround so the suspension functions properly without buckling.
I received my kit but it looks like there is only one surround inside. Where is the other one?
Don't worry! In almost all of our North Speaker Parts kits, the speaker surrounds are nested or lightly pressed together in transit to protect them. Carefully inspect the edges and gently peel them apart—you will find two distinct surrounds ready for your repair.
Installation Tips & Technical Support
How do I prepare the speaker frame and cone for the new surround?
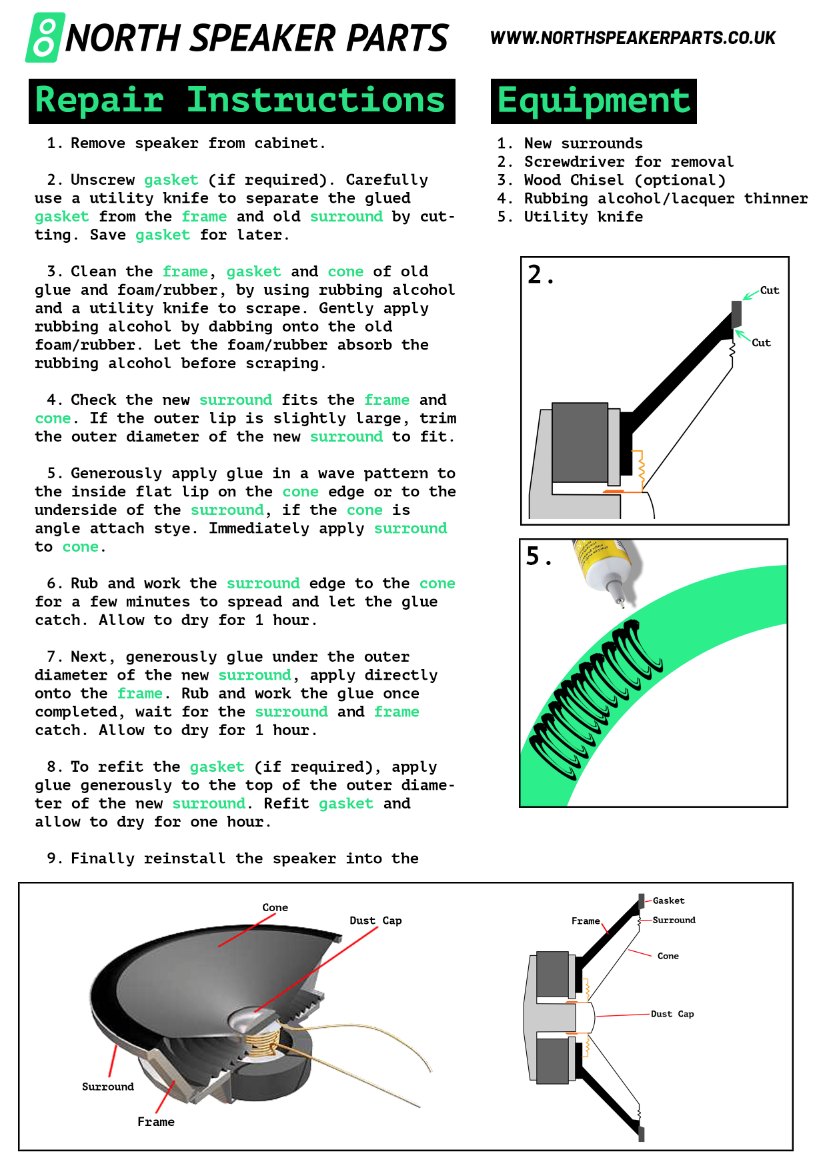
The secret to a perfect repair is preparation. You must completely remove the old, degraded foam and adhesive residue:
- Carefully scrape the metal basket/frame using a plastic scraper or utility knife until it is bare metal. Rubbing alcohol can help dissolve stubborn adhesive.
- Gently scrape the outer edge of the cone. Be incredibly careful with paper cones—take your time and work in small sections so you don't tear the material.
- The surfaces must be completely dry and free of debris before applying speaker adhesive.
Do I need to remove the dust cap and shim the voice coil?
For most standard home audio woofer repairs, shimming is not strictly necessary if you use the hand-centering method. By applying even pressure around the cone while the glue cures, you can feel if the voice coil is rubbing. However, for high-excursion subwoofers or heavy-duty pro audio drivers, removing the dust cap and using plastic shims ensures absolute precision.
How long does the speaker repair glue take to cure?
Our specialized speaker repair adhesive begins to tack up within 5 to 10 minutes, allowing you time to adjust the alignment. We recommend letting the glue dry for at least 24 hours before mounting the speaker back into its cabinet and applying audio power.