Why JBL Control One Speakers Lose Their Sound
The JBL Control One is one of the most popular compact monitor speakers ever made. Introduced in the late 1980s and still sought-after today, these little bookshelf speakers earned a devoted following for their tight, accurate sound and remarkable versatility — equally at home as hi-fi monitors, desktop speakers, or background music systems.
But there's a catch that every Control One owner eventually discovers: the foam surround that suspends the woofer cone deteriorates over time. After 15–25 years, the foam hydrolises, crumbles, and falls apart — leaving your woofer cone loose, distorted, or completely unsupported. The result is a speaker that either rattles, produces no bass at all, or has stopped working entirely.
The good news is that this is a completely fixable problem. A foam surround replacement kit costs a fraction of what the speakers are worth, and with a little patience you can restore your JBL Control Ones to factory specification in an afternoon.
Which JBL Control One Models Does This Kit Fit?
Our JBL Control One Foam Repair Kit is sized specifically for the 5-inch woofer used across the entire Control One family and several related JBL models:
- JBL Control 1 — the original model
- JBL Control 1C — ceiling/wall mount variant
- JBL Control 1G — outdoor/all-weather version
- JBL Control SB1 — surface-mount variant
- JBL Control 1SE — special edition
- JBL Control 5
- JBL LX-44 (midrange driver)
- JBL TLX-105
- JBL R103, R121, R123, R133
The surround measures 125mm outer diameter with an 80mm inner diameter (Model 5F#1, 0.5mm gauge, flat edge). If your model isn't listed, contact us and we'll confirm fitment before you order.
What's Included in the Repair Kit
The North Speaker Parts JBL Control One repair kit includes everything you need for a complete, professional-quality repair:
- 2× premium foam surrounds (one pair)
- 1× T7000 high-grade adhesive
- 1× precision applicator brush
- 1× detailed paper instructions
No other adhesives, no hunting for the right glue — everything arrives ready to use.
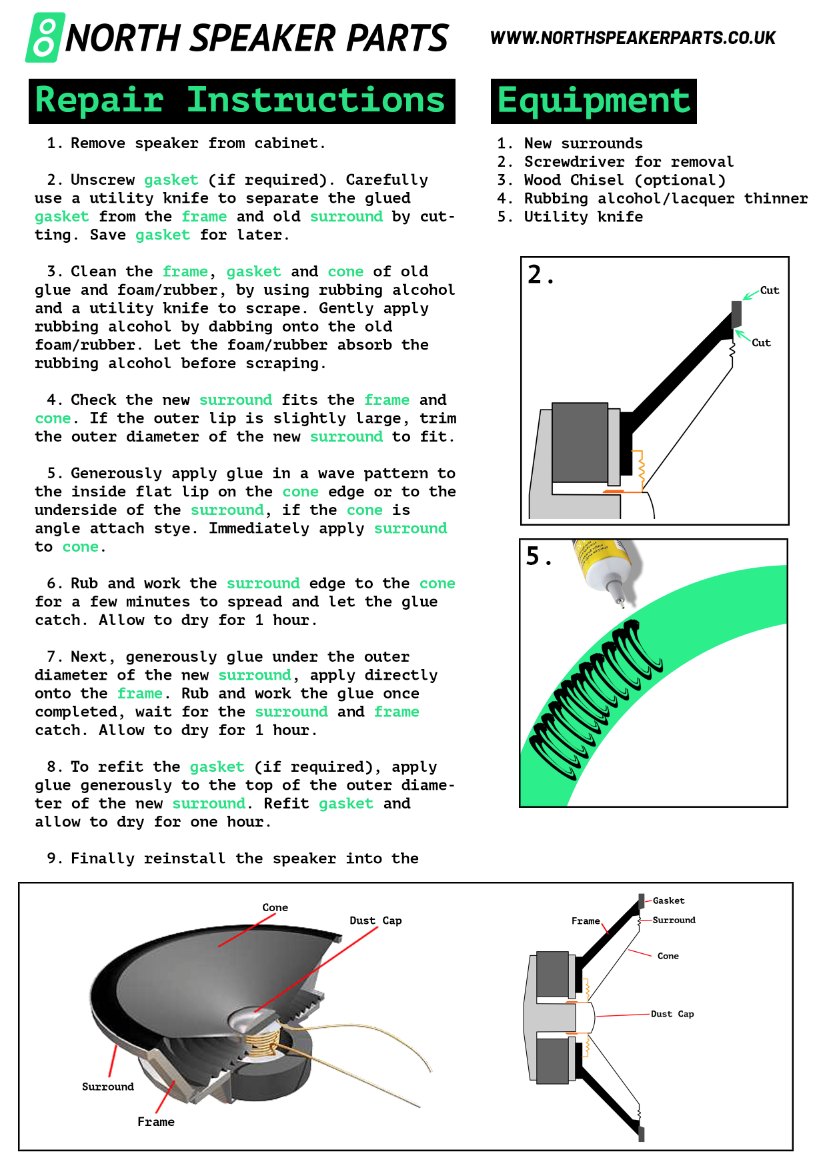
Step-by-Step: How to Repair JBL Control One Foam Surrounds
What You'll Need
- The repair kit (foam surrounds, T7000 glue, brush)
- A flat workspace with good lighting
- A small flathead screwdriver or Safe-Scrape tool
- IPA wipes or isopropyl alcohol for cleaning
- Patience — rushing is the main cause of failed repairs
Step 1: Remove the Woofer
Unscrew the driver from the cabinet. On most Control One variants, four screws hold the woofer in place. Gently ease the driver forward and disconnect the spade terminals. Set the cabinet aside.
Step 2: Remove the Old Foam
Carefully peel away the crumbling foam surround. Use a Safe-Scrape tool or a blunt implement to remove residual foam from both the cone edge and the basket rim — do not use anything sharp near the cone. IPA wipes make this step much easier, dissolving old adhesive without damaging the paper cone.
Take your time here. Any leftover foam or glue will prevent the new surround from seating flat.
Step 3: Test-Fit the New Surround
Before applying any adhesive, dry-fit the new foam surround. It should sit naturally flat against the cone edge and basket rim with no gaps. Centre the cone so it sits evenly in the magnet gap — this is critical for preventing voice coil rub.
Step 4: Glue the Inner Edge (Cone)
Apply a thin, even bead of T7000 around the inner edge of the foam surround. Press it onto the cone edge and allow to tack for 2–3 minutes. Check the cone is still centred, then allow to cure for 30 minutes before moving to the outer edge.
Step 5: Glue the Outer Edge (Basket)
Apply T7000 around the basket rim. Press the outer edge of the foam down firmly and evenly. Again check that the cone is centred in the gap before the glue sets.
Step 6: Cure and Reinstall
Allow the adhesive to cure for a minimum of 2 hours (overnight is ideal) before reinstalling the driver. Reconnect the spade terminals, refit the screws, and power up your amplifier. Start at low volume and listen for any rubbing — a correctly centred repair will sound clean and full immediately.
Common JBL Control One Repair Questions
Can I repair just one speaker, or do I need to do both?
We always recommend repairing both speakers at the same time. If one surround has failed, the other is very likely to follow within months. Doing both ensures a matched pair and saves you pulling everything apart again shortly after.
Will the repaired speaker sound the same as original?
Yes — when fitted correctly with a correctly-sized surround, the driver returns to its original specification. Many customers report their Control Ones sounding better than they have in years after a foam repair.
My cone is touching the pole piece. What's wrong?
This indicates the voice coil is not centred. Stop immediately — do not apply power. The surround may need to be repositioned before the adhesive fully cures. If you're unsure, contact us for guidance.
How long will new foam surrounds last?
High-quality foam surrounds, properly fitted and kept away from direct UV and extreme humidity, typically last 20–30 years — matching the original lifespan.
Ready to Restore Your JBL Control Ones?
Don't let deteriorated foam write off a pair of classic speakers worth repairing. Our kit has everything you need for a professional result at home.
Order the JBL Control One Foam Repair Kit — £7.95 with free UK shipping →