Paradigm has built a strong reputation among audiophiles for producing accurate, musical speakers at sensible prices. Canadian-engineered and built to a higher standard than most of the competition, Paradigm speakers from the Monitor, Titan, and Studio series remain highly sought after on the secondhand market — and for good reason. But foam surrounds don't last forever. If your Paradigm speakers sound distorted, lack bass, or rattle at low volumes, a foam surround replacement is almost certainly the fix.
How to Tell If Your Paradigm Speaker Needs New Foam
Run your finger gently around the surround — the ring of foam that connects the cone edge to the driver basket. On a healthy driver it will feel soft and springy. If it crumbles, tears, or feels hard and brittle, the foam has deteriorated and needs replacing. You may also see visible cracking or sections that have separated from the cone or basket entirely.
Common Paradigm models that need foam surround replacement include the Monitor 3, Monitor 5, Monitor 7, Titan, Mini Monitor, Atom, and various Studio series models. The 10" woofer is found in floor-standing models and larger bookshelf variants.
Choosing the Right Paradigm Repair Kit
Paradigm uses drivers in several sizes. Always measure the outer diameter (OD) of the existing surround before ordering — the OD is the most reliable way to confirm the correct size, regardless of the advertised speaker size.
- Paradigm 6" woofers (Atom, Mini Monitor, Titan v3–v5): Paradigm 6" Foam Repair Kit — £8.95
- Paradigm 8" woofers (Monitor 5, Monitor 7, various Studio series): Paradigm 8" Foam Repair Kit — £8.95
- Paradigm 10" woofers (Monitor 9, Studio 40/60, larger floor-standers): Paradigm 10" Foam Repair Kit (OD: 247mm, ID: 177mm) — £9.95
Each kit includes a pair of foam surrounds, T7000 adhesive, an applicator brush and printed step-by-step instructions.
Step-by-Step: Paradigm 10" Foam Surround Replacement
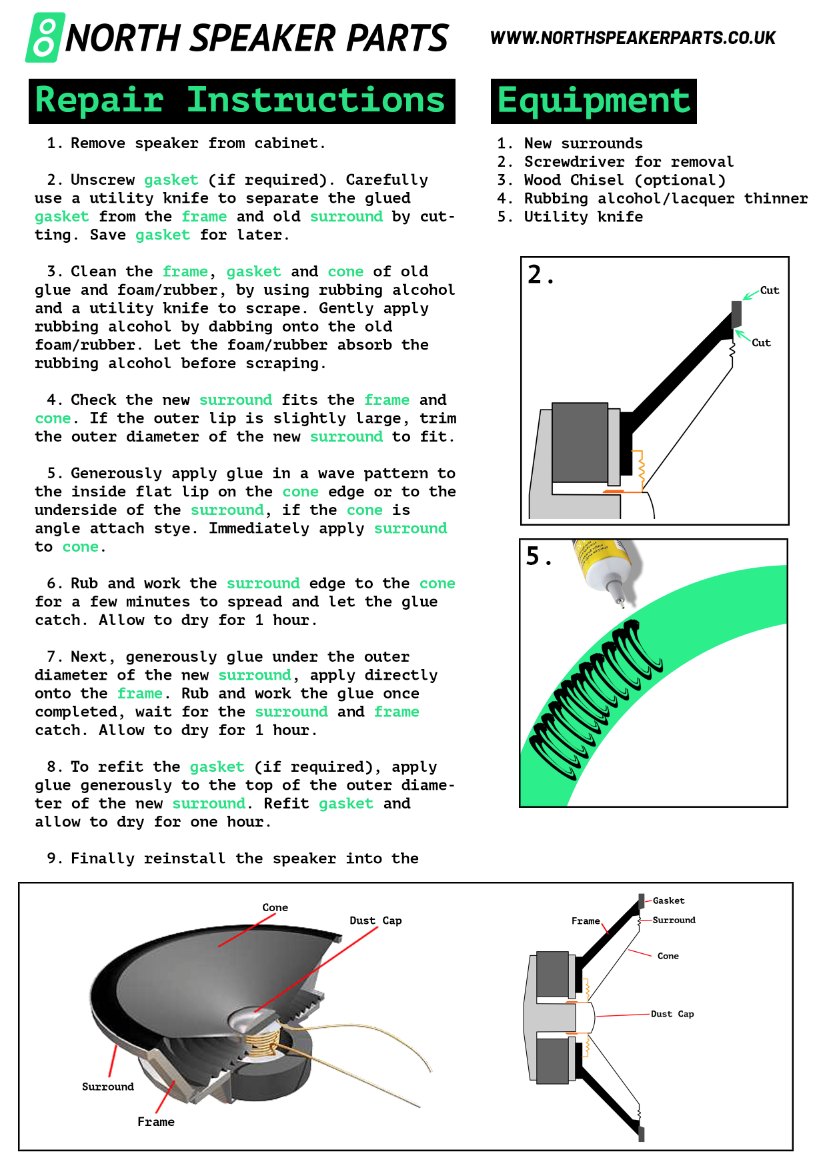
The process is the same for all Paradigm driver sizes. This walkthrough uses the 10" as the example, but the steps apply equally to the 6" and 8" kits.
Tools and Materials
- Paradigm foam repair kit (includes surrounds, T7000 glue, brush, instructions)
- Isopropyl alcohol (90% or higher)
- Cotton swabs or lint-free cloth
- Phillips and flat-head screwdrivers
1. Remove the Grille and Woofer
Pull the grille frame away from the baffle — most Paradigm grilles clip on without screws. Unscrew the woofer from the baffle (typically four Phillips screws). Tilt the driver forward and disconnect the spade terminals, noting which colour wire connects to positive. Set the driver on a clean, flat surface.
2. Strip the Old Foam
Carefully peel away the deteriorated foam surround. It will likely come away in pieces. Use a flat screwdriver or spatula to scrape any remaining residue from the cone edge and the basket rim. Then wipe both surfaces with isopropyl alcohol to remove any oils, adhesive residue or dust. This cleaning step is essential — new foam will not bond reliably to a contaminated surface. Allow everything to dry for 10 minutes before proceeding.
3. Dry-Fit the New Surround
Before applying any adhesive, place the new foam surround in position to check that it sits flush with the basket rim and the cone edge. The inner diameter should rest cleanly on the cone without bunching or gaps. If it doesn't sit correctly, contact us before proceeding — we can advise on the correct kit for your specific driver.
4. Glue the Outer Edge First
Apply a thin bead of T7000 adhesive around the basket rim. Seat the outer edge of the foam surround into the adhesive. T7000 has a working time of approximately 5–10 minutes — use this time to confirm the surround is sitting evenly all the way round. Press gently and hold.
5. Centre the Voice Coil and Glue the Inner Edge
Apply a thin bead of T7000 to the inner edge of the surround, then lower the cone edge into place. To centre the voice coil: press the cone gently downward and release it. It should return to centre with no rubbing or scraping. If you feel resistance or hear a scratching sound, the coil is off-centre — adjust the inner surround position slightly and test again before the adhesive sets.
6. Allow 24 Hours to Cure
T7000 reaches full strength after 24 hours. Leave the driver flat on your workbench — don't reinstall it or apply any audio signal during this time. Once cured, reinstall, reconnect the terminals, and test at low volume to confirm the repair before running full power.
Why Paradigm Buyers Convert at the Highest Rate
Paradigm speaker owners tend to be knowledgeable, careful buyers — and that shows in how they approach repairs. Rather than discarding speakers worth hundreds of pounds, they invest £9.95 in a repair kit and restore the performance they paid for. The Paradigm 10" foam repair kit is one of our highest-rated products, and the results speak for themselves.
Shop Paradigm Repair Kits
All three Paradigm kit sizes are in stock and ready for same-day dispatch on orders placed before 4pm. Free UK delivery via Royal Mail 1st Class.
- Paradigm 6" Foam Repair Kit — £8.95
- Paradigm 8" Foam Repair Kit — £8.95
- Paradigm 10" Foam Repair Kit — £9.95
Not sure which size you need? Contact us with your speaker model and we'll confirm the correct kit before you order.