The JBL Control One is one of the most popular compact bookshelf speakers ever made — beloved for its clean sound and versatility. But like all foam-surround speakers, the woofer surround degrades over time. If your Control One sounds thin, rattles, or produces no bass at all, a deteriorated foam surround is almost certainly the cause.
The good news: this is one of the most straightforward speaker repairs you can do at home, and it costs a fraction of replacement. This guide walks you through the full process.
Watch: JBL Control One Foam Surround Replacement
Follow along with our step-by-step video guide showing the complete repair process from start to finish:
What You Will Need
- JBL Control One foam surround repair kit (includes 2x surrounds, adhesive glue, brush & instructions)
- Isopropyl alcohol (rubbing alcohol) for cleaning
- A flat blade tool or thin spatula
- Paper towels or lint-free cloth

Step-by-Step: How to Replace the JBL Control One Foam Surround
Step 1 — Remove the grille and speaker driver
Gently pull the front grille away from the cabinet — it clips on and should come free without tools. With the grille removed, you will see the woofer driver secured by four screws. Remove these and carefully pull the driver forward, taking care not to strain the wiring. You do not need to disconnect the wires — just rest the driver on the front of the cabinet.
Step 2 — Remove the old foam surround
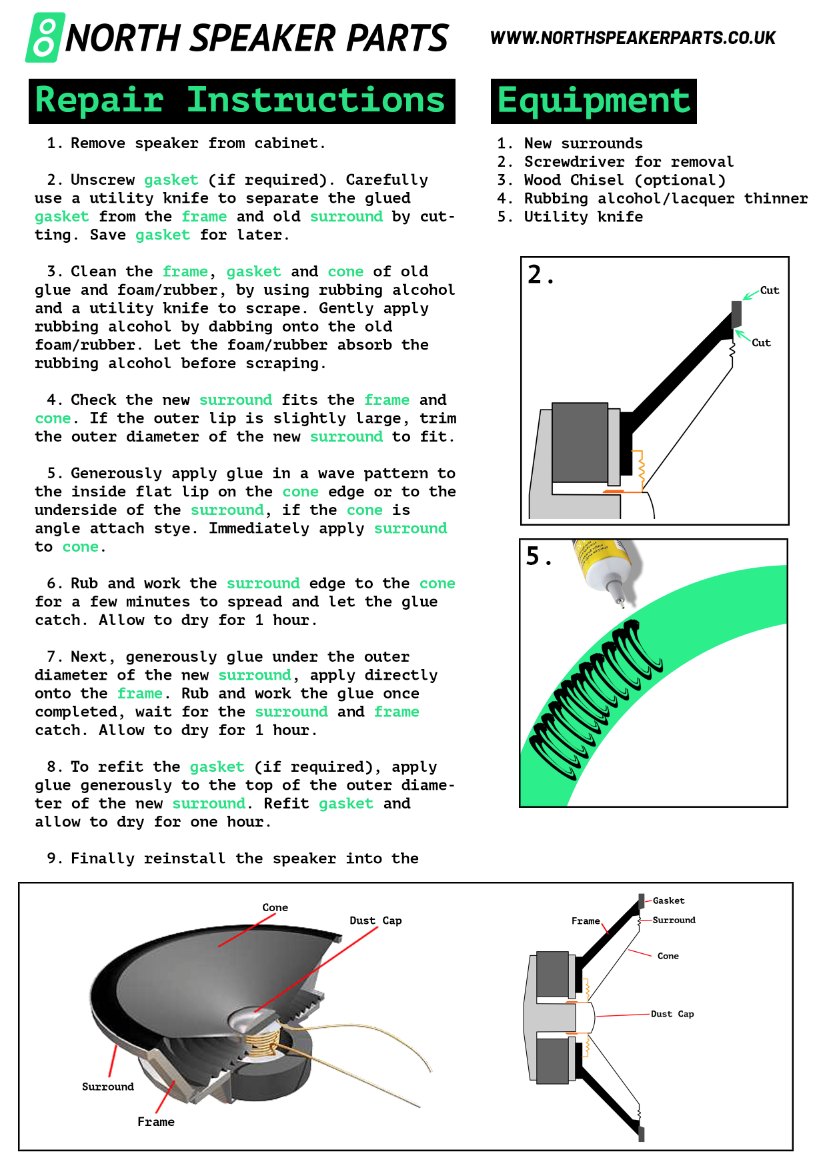
The old foam surround is glued to both the speaker cone and the metal basket. Carefully peel the deteriorated foam away — it will likely crumble. Use a flat tool to scrape off any remaining foam from the basket rim and cone edge. The cleaner the surface, the better your bond will be.
Step 3 — Clean the surfaces
Apply isopropyl alcohol to a cloth or paper towel and wipe down both the basket rim and the outer edge of the cone. Remove all residue and allow to dry completely before applying any adhesive. Skipping this step is the most common cause of a failed repair.
Step 4 — Fit the new foam surround
Dry-fit the new surround first to check alignment — the inner edge should sit flush on the cone, and the outer edge should align with the basket rim all the way around. Once you are happy with the fit, apply a thin, even bead of adhesive to the basket rim, position the surround outer edge, and press firmly. Allow to tack for a few minutes, then apply adhesive to the cone edge and press the inner lip down.
Step 5 — Centre the voice coil
Before the glue cures, gently press the cone in and out to check that the voice coil moves freely without rubbing. If you feel or hear any friction, adjust the surround position while the glue is still workable.
Step 6 — Allow to cure and reassemble
Leave the repair to cure for a minimum of 24 hours before testing. Once fully cured, reconnect the driver, screw it back into the cabinet, and refit the grille. Play some music at low volume first and gradually increase — your JBL Control One should be producing full, clean bass again.
Frequently Asked Questions
Which JBL Control One models does this kit fit?
This repair kit fits the JBL Control 1, Control 1C, Control 1G, Control SB1, and Control 1SE. Check the model number on the back of your speaker before ordering if you are unsure.
How long does the repair take?
The hands-on work takes around 30–45 minutes per speaker. You then need to allow 24 hours for the adhesive to cure fully before testing.
Is this a difficult repair?
The JBL Control One is one of the easier speakers to re-foam. If you have never done a speaker repair before, this is a good starting point — especially with the video guide above.
Can I repair just one speaker or do I need to do both?
If one surround has deteriorated, the other almost certainly has too. We recommend repairing both at the same time. Our kit covers one speaker, so order two kits for a pair.
Ready to restore your speakers?
Get the JBL Control One Repair Kit
Free UK shipping · Same-day dispatch before 4pm · 93 in stock