Boston Acoustics built some of the most respected hi-fi speakers of the 1980s and 1990s. The A-series bookshelf monitors, T-series towers, and HD-series systems were staples of British and American living rooms — praised for their warm, musical presentation and exceptional value. But like all speakers from that era, they rely on polyurethane foam surrounds that have long since broken down.
If your Boston Acoustics speakers are rattling, producing distorted bass, or sounding thin and lifeless, a failed foam surround is almost certainly the cause. The good news: this is a straightforward repair, and the results are dramatic. This guide covers every Boston Acoustics model we stock repair kits for.
Find Your Kit — Boston Acoustics Foam & Rubber Repair Kits
Boston Acoustics used several different driver sizes across their range. Use the guide below to find the right kit for your model.


Also Available
- 6" Foam Repair Kit — Fits A120 midrange, A400 midrange, HD9, T930, T1000, T1030 & more — £8.95
- 6.5" Rubber Repair Kit — Fits A2, A40, A120, A400, T1000, T930, Sub/Sat 6 & more — £8.95
- 6.5" Midrange Foam Kit — T1000 midrange driver only (bass woofers use 8" kit) — £8.95
Not sure which kit you need? Get in touch — send us your model number and we’ll confirm the right surround before you order.
Why Boston Acoustics Foam Fails
Boston Acoustics speakers from the 1980s and 1990s used polyurethane foam surrounds — the flexible ring between the speaker cone and the metal basket. Polyurethane foam has a typical lifespan of 15–25 years, which means virtually every original Boston speaker is now well past the point of failure. The foam oxidises and crumbles even in storage, regardless of how often the speakers have been used.
Signs that your Boston Acoustics foam has failed:
- Visible crumbling, cracking, or holes in the surround
- Rattling or buzzing at any volume
- One speaker noticeably quieter or more distorted than the other
- Loss of bass — the sound becomes thin or tinny
- The cone wobbles side-to-side rather than moving cleanly in and out
The driver itself — the magnet, voice coil, and cone — almost always survives in perfect condition. A foam replacement genuinely restores these speakers to their original performance.
Boston Acoustics Model Guide: Which Kit Fits Which Speaker?
A-Series Bookshelf Monitors
- A40, A40 Series II, A40 Series V — 6.5" Rubber Repair Kit
- A60, A60-II — 8" Foam Repair Kit (A60/A70/A80)
- A70 — 8" Foam Repair Kit (A60/A70/A80)
- A80 — 8" Foam Repair Kit (A60/A70/A80)
- A90 — 8" Foam Repair Kit (A400/A90/HD8/HD9)
- A100 — 10" Foam Repair Kit
- A120 — 10" Foam Repair Kit (woofer) + 6" or 6.5" Rubber Kit (midrange)
- A150, A200 — 10" Foam Repair Kit
- A400 — 8" Foam Repair Kit (A400/A90) for woofer; 6" Foam or 6.5" Rubber Kit for midrange
T-Series Towers
- T70, T100 — 8" Foam Repair Kit (A60/A70/A80)
- T820, T830 — 8" Foam Repair Kit (A60/A70/A80)
- T930 — 8" Foam Repair Kit for woofers + 6" Foam Kit for midrange
- T1000 — 8" Foam Repair Kit for woofers + 6.5" Midrange Foam Kit for midrange driver
- T1030 — 8" Foam Repair Kit for woofers + 6" Foam Kit for midrange
HD & VR Series
- HD8, HD9 — 8" Foam Repair Kit (A400/A90/HD8/HD9)
- HD10 — 6" Foam Repair Kit
- VR960 — 8" Foam Repair Kit (A60/A70/A80)
Step-by-Step: How to Replace Boston Acoustics Foam Surrounds
Step 1 — Remove the grille and speaker driver
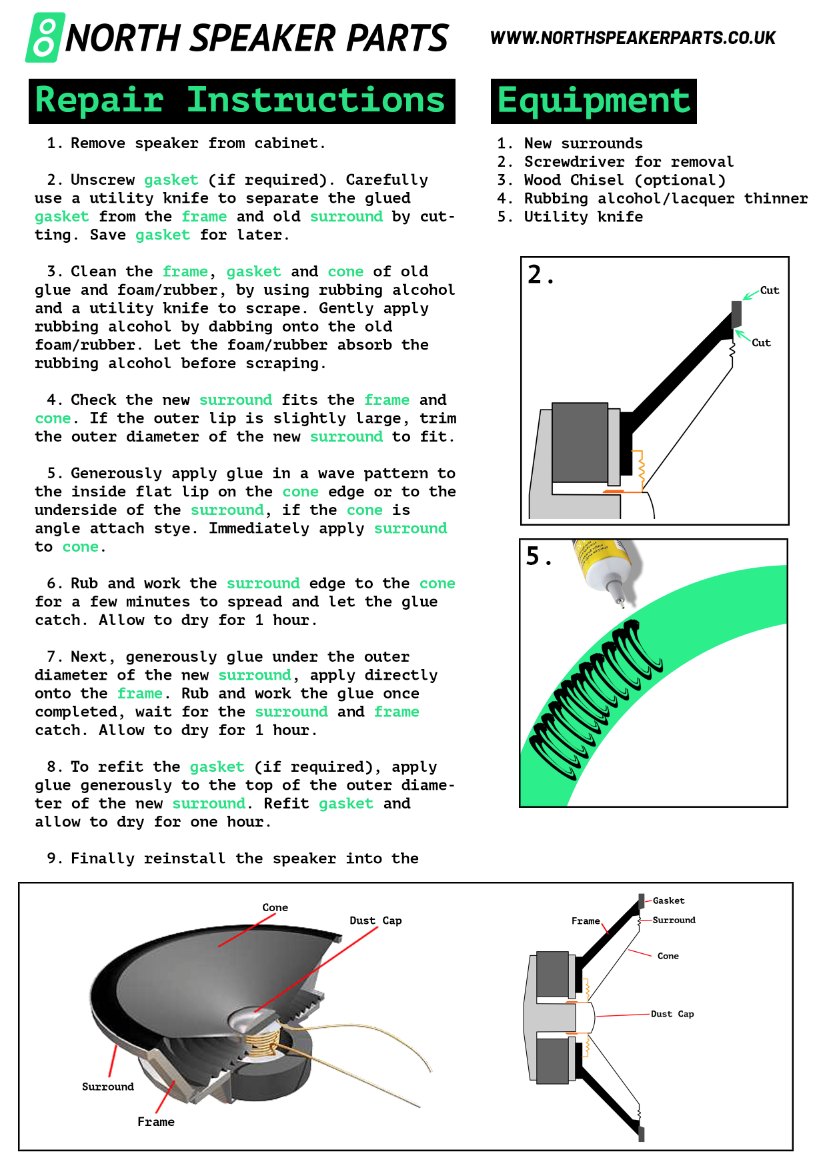
Most Boston Acoustics speakers have a cloth grille held by press-fit pegs — pull it away from the front of the cabinet. With the grille removed, unscrew the woofer driver (typically 4–6 screws around the perimeter). You do not need to disconnect the wires — simply rest the driver face-down on a soft cloth in front of the cabinet.
Step 2 — Remove the old foam surround
The old foam will crumble as soon as you touch it — that’s normal. Peel away the deteriorated material from both the outer edge of the cone and the basket rim. Use a flat tool or spatula to lift any stubborn sections. Work patiently: a clean gluing surface is the most important factor in a successful repair.
Step 3 — Clean both surfaces
Apply isopropyl alcohol (90%+ recommended) to a cloth or cotton bud and clean the basket rim and cone edge thoroughly. Remove all traces of old adhesive and foam residue. Allow to dry completely — around 5–10 minutes — before proceeding.
Step 4 — Dry-fit the new surround
Before applying any adhesive, position the new foam surround on the driver without glue. Check that the inner edge sits evenly around the cone with a consistent gap all the way round, and that the outer edge lines up with the basket rim. This rehearsal is important: once glue is applied, working time is limited.
Step 5 — Glue the outer edge to the basket rim
Apply a thin, even bead of adhesive to the basket rim all the way around. Press the outer edge of the foam surround firmly onto the rim, keeping it centred. Hold in place for 2–3 minutes, then leave to tack for a further 5 minutes.
Step 6 — Centre the voice coil and glue the inner edge
Before gluing the inner edge to the cone, centre the voice coil in the magnetic gap. Slide four small paper shims evenly around the former into the gap, then gently press the cone down so the shims hold it centred. Apply adhesive to the cone edge, press the foam’s inner lip down firmly, and allow to cure for 20–30 minutes. Then carefully remove the paper shims.
Step 7 — Test and reassemble
Connect the driver temporarily to your amplifier at low volume and listen for clean, distortion-free sound. Push the cone in and out gently — it should move freely with no scraping. Once satisfied, screw the driver back into the cabinet, refit the grille, and allow 24 hours of curing before playing at high volumes.
Tips Specific to Boston Acoustics Speakers
- T-series 3-way speakers: The T930, T1000, and T1030 have both a woofer and a separate midrange driver, both of which may need new surrounds. Order both kits at the same time.
- A120 and A400: These are also multi-way designs — measure both drivers before ordering.
- Compliance break-in: New foam is slightly stiffer than worn-in surrounds. Play your speakers at moderate volume for 10–15 hours to allow the compliance to settle.
- Rubber surrounds: The 6.5" rubber kit is for Boston models that originally used a rubber midrange surround. If your midrange still sounds clean, it may not need replacing.
Frequently Asked Questions
How do I know which Boston Acoustics kit I need?
Check the label on the back of the cabinet for the model number, then use the model guide above. If you’re still unsure, measure the inner diameter of the surround ring and contact us with the measurement — we’ll confirm the right kit.
Is this repair permanent?
Yes. Modern foam surrounds use an improved formulation with significantly better UV and oxidation resistance than the original 1980s material. A properly done re-foam should last another 20–30 years.
Can I do this repair with no experience?
Boston Acoustics A-series speakers are one of the most popular first re-foam projects. The drivers are accessible, the surrounds are a straightforward flat-edge design, and our kits include full paper instructions.
Do I need to repair both speakers?
If one surround has failed, the other almost certainly has too — even if it still looks intact. We strongly recommend doing both at once. All kits include two surrounds.
Ready to bring your Boston Acoustics speakers back to life?
Shop All Boston Acoustics Repair Kits
Free UK shipping · Same-day dispatch before 4pm · All kits include glue & instructions