Acoustic Research (AR) speakers from the 1960s through the 1990s are legendary in the hi-fi world. Models like the AR-3, AR-14, AR-18, AR-M4, and TSW series were benchmark speakers of their era — but every one of them used foam surrounds that have long since deteriorated. If your AR speakers are producing distorted bass, a rattling cone, or no sound at all, a foam surround replacement is almost certainly the fix.
This guide covers everything you need to know to restore your Acoustic Research speakers to their original performance, step by step.
Watch: AR18s Foam Surround Replacement
Follow along with our hands-on video guide showing the complete repair process for the AR18s and AR family speakers:

Why AR Speaker Foam Fails
Acoustic Research speakers use polyurethane foam surrounds — the flexible ring that connects the cone edge to the speaker basket. This foam is critical: it allows the cone to move freely while sealing the front chamber from the rear. From the factory, AR foam surrounds typically have a lifespan of 15–25 years. Most original AR speakers from the 1970s and 1980s are now 40–50 years old, meaning the foam has long since broken down.
Common signs of failed foam on AR speakers:
- Visible cracks, crumbling, or holes in the surround ring
- Distorted or muffled bass even at low volumes
- Rattling or buzzing when the cone is pushed
- One speaker noticeably quieter than the other
- Complete loss of bass output (foam fully disintegrated)
The good news: the speaker drivers themselves are almost always in perfect condition. The magnets, voice coils, and cones last indefinitely. A foam replacement restores these speakers completely.
Which Foam Kit Do You Need?
The correct kit depends on your specific AR model. Here are the three most common Acoustic Research foam repair kits available from North Speaker Parts:
AR-14, AR-5, AR-38s — 10" Foam Repair Kit
Fits: AR 14, AR 5, AR 38s, and several other 10" AR woofers. This kit includes a pair of pre-cut foam surrounds, dust caps, adhesive, and full instructions.
View the AR-14 / AR-5 / AR-38s 10" Foam Repair Kit →
AR-M4, TSW-610, 8Bxi, 8B, Spirit 122 — 6.5" Foam Repair Kit
Fits: AR M4, TSW-610, 8Bxi, 8B, Spirit 122. A precision-matched surround for 6.5" AR woofers and midrange drivers.
View the AR-M4 / TSW-610 6.5" Foam Repair Kit →
AR-18s, AR-6, AR-18Bxi — 8" Foam Repair Kit
Fits: AR 18s, AR 6, AR 18Bxi. Correct profile and compliance for 8" AR woofers.
View the AR-18s / AR-6 / AR-18Bxi 8" Foam Repair Kit →
Not sure which kit fits your speakers? Check the speaker label on the back of the driver for the model number, then measure the cone diameter (inner diameter of the surround) and overall driver diameter before ordering.
What You'll Need
Each North Speaker Parts kit includes the foam surrounds and adhesive. You'll also need:
- A flat-head screwdriver or putty knife (to prise out the woofer)
- Isopropyl alcohol (90%+ recommended)
- Cotton buds and clean cloth
- Toothpicks or a small brush (for applying glue accurately)
- Masking tape
- 1–2 hours per speaker pair
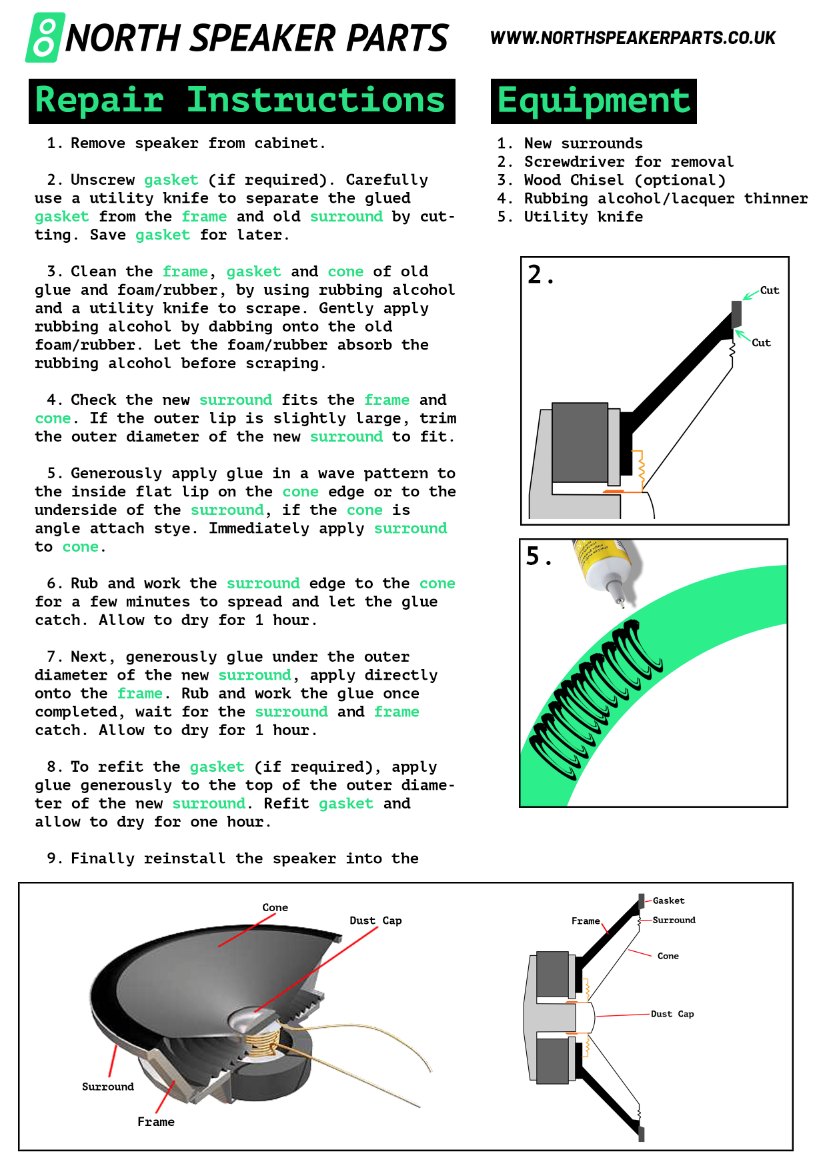
Step-by-Step: How to Replace AR Speaker Foam Surrounds
Step 1 — Remove the Woofer from the Cabinet
AR speakers typically mount the woofer from the front, behind a grille cloth. Remove the grille (usually held by press-fit pegs or Velcro), then unscrew the driver — usually 4 to 8 bolts around the perimeter. Disconnect the push-terminal wires, noting which colour goes to which terminal. Lay the driver face-down on a soft towel.
Step 2 — Remove the Old Foam
The old foam usually crumbles away with gentle handling. Peel away the remaining pieces carefully to avoid bending the cone or damaging the dust cap. Use a flat tool to lift stubborn sections. Be patient — the goal is a completely clean glue surface on both the cone edge and the basket rim.
Step 3 — Clean Both Gluing Surfaces
Using isopropyl alcohol on a cotton bud, remove all traces of old adhesive and foam residue from:
- The outer edge of the cone (where the foam outer ring will sit)
- The basket rim (the metal or plastic ledge around the driver frame)
Allow both surfaces to dry fully — typically 5–10 minutes.
Step 4 — Dry-Fit the New Surround
Before applying any adhesive, dry-fit the new foam surround. Centre it over the cone so the gap between the dust cap and the inner edge of the foam is uniform all the way around. Check the outer edge sits flat on the basket rim. This rehearsal step is important — once the glue is applied you have a limited working time.
Step 5 — Glue the Inner Edge (Cone)
Apply a thin, even bead of adhesive to the outer rim of the cone. Position the foam surround carefully, keeping it centred. Press gently all the way around and allow to tack (approximately 5 minutes). While it cures, keep the cone perfectly still.
Step 6 — Centre the Voice Coil and Glue the Outer Edge
Before gluing the outer edge to the basket, you must ensure the voice coil is centred in the magnetic gap. To do this:
- Cut four strips of paper (from a Post-it note works well) and slide them evenly around the voice coil former into the gap
- Gently push the cone down so the shims hold the coil centred
- Apply adhesive to the basket rim
- Press the outer foam edge firmly onto the basket rim all the way around
- Allow to cure for 20–30 minutes before removing the paper shims
Step 7 — Replace the Dust Cap (if required)
If the old dust cap was removed or damaged, apply a small amount of adhesive around the voice coil former and press the new dust cap into place. Hold for 2–3 minutes.
Step 8 — Test Before Reassembly
Connect the driver to an amplifier at low volume and test for clean, distortion-free sound. Gently press the cone in and out — it should move freely with no rubbing or scraping. If you hear a scrape, the voice coil is slightly off-centre; allow the outer glue to soften slightly with a hair dryer and re-centre.
Step 9 — Reinstall in the Cabinet
Once satisfied, reconnect the terminals (positive to positive — usually the red terminal), screw the driver back into the cabinet, and refit the grille. Allow 24 hours for the adhesive to fully cure before playing at high volumes.
Tips Specific to Acoustic Research Speakers
- AR-3a and AR-3: These use a cloth surround, not foam — they don't need this repair. The midrange and tweeter shims may need attention instead.
- Multiple drivers per cabinet: Many AR models (AR-11, AR-9, AR-90) have multiple woofers. Replace surrounds on all drivers at the same time for balanced performance.
- Compliance break-in: New foam surrounds are slightly stiff. Play your AR speakers at moderate volume for 10–15 hours to allow the surrounds to loosen and reach their design compliance.
- Grille cloth: If you're restoring a pair properly, consider replacing the grille cloth at the same time — it's straightforward and completes the restoration visually.
Shop Acoustic Research Foam Repair Kits
All North Speaker Parts foam repair kits are shipped with adhesive and full instructions. They're designed to be an exact match for the original AR surround profile — not generic surrounds that require trimming or modification.
- AR-14, AR-5, AR-38s — 10" Foam Repair Kit
- AR-M4, TSW-610, 8Bxi, 8B — 6.5" Foam Repair Kit
- AR-18s, AR-6, AR-18Bxi — 8" Foam Repair Kit
If you're not sure which kit matches your Acoustic Research model, feel free to get in touch — we're happy to help you identify the right surround before you order.
Ready to restore your AR speakers?
Get the AR18s 8" Foam Repair Kit
Free UK shipping · Same-day dispatch before 4pm